Manual Rev.: 1.2
Revision Date: July xx, 2022
Part Number: 50M-00011-1020
Preface
Copyright
Copyright © 2022 ADLINK Technology, Inc. This document contains proprietary information protected by copyright. All rights are reserved. No part of this manual may be reproduced by any mechanical, electronic, or other means in any form without prior written permission of the manufacturer.
Disclaimer
The information in this document is subject to change without prior notice in order to improve reliability, design, and function and does not represent a commitment on the part of the manufacturer. In no event will the manufacturer be liable for direct, indirect, special, incidental, or consequential damages arising out of the use or inability to use the product or documentation, even if advised of the possibility of such damages.
Trademarks
Product names mentioned herein are used for identification purposes only and may be trademarks and/or registered trademarks of their respective companies.
Revision History
| Revision | Description | Date |
|---|---|---|
| 1.0 | Initial release | 2021-04-21 |
| 1.1 | Release for EVA SDK R3.5 | 2021-07-14 |
| 1.2 | Release for EVA SDK R3.8
Add ROS 2 Foxy Fitzroy environment setting. |
2022-07-xx |
¶ 1 Introduction
The ADLINK Edge Vision Analytics (EVA) SDK provides an integrated development environment (IDE) for developers wanting to build computer vision and video analytic solutions with deep learning technology. The EVA SDK IDE is based on PyFlow, a general purpose runtime extendable Python Qt visual scripting framework, to expand the EVA SDK. The EVA SDK IDE allows users to quickly establish GStreamer pipelines and easily modify their properties.
This document introduces the EVA SDK IDE interface including how to generate GStreamer pipelines and how to get admetadata information from ADLINK GStreamer elements. This document does not include information on PyFlowBase features. For more details about the PyFlowBase, refer to https://pyflow.readthedocs.io/en/latest/index.html.
The EVA SDK IDE supports 64-bit Microsoft Windows operating systems. Refer to the EVA SDK Installation Guide for information on installing any additionally required software.
On Windows, after installing the EVA SDK and required software, execute the EVA SDK IDE using one of the following methods:
Method 1: Run the desktop shortcut.
From the Windows Desktop, double-click the EVA SDK IDE icon.

The shortcut will automatically set the environment variables and execute the EVA SDK IDE.
Method 2: Manually run the environment variable settings, and then execute the EVA SDK IDE.
Open a command prompt in Windows and run the following command to clear the GStreamer cache and set the environment variables.
| > C:\ADLINK\gstreamer\setupvars.bat > C:\ADLINK\eva\scripts\setup_eva_envs.bat |
Note: The environment variables are removed when the command prompt is closed.
After setting the environment variables, execute the EVA SDK IDE.
| > EVA_IDE.exe |
On Linux (including x86 and AArch64), after installing the EVA SDK and required software, use the following command to execute the EVA SDK IDE.
| $ source /opt/adlink/eva/scripts/setup_eva_envs.sh
$ EVA_IDE |
If you use a ROS 2 connector plugin (rosgstbridge), follow these methods to set up the environment and execute the EVA SDK IDE.
On Windows, after installing ROS 2 Foxy Fitzroy, the EVA SDK and required software, execute the EVA SDK IDE using one of the following methods:
Method 1: Run the desktop shortcut.
Open C:\ADLINK\eva\EVAIDE.bat, and add the following command to the beginning of the batch file.
| @echo off
call C:\dev\ros2_foxy\local_setup.bat ... |
Note: If you followed the installation guide, the default path is C:\dev\ros2_foxy\local_setup.bat.
If you changed the ROS 2 folder when installing ROS 2 Foxy Fitzroy, fill in the actual path.
Double-click the EVA SDK IDE icon from the Windows Desktop.

Method 2: Manually run the environment variable settings, and then execute the EVA SDK IDE.
Open a command prompt in Windows and run the following commands to set the environment variables.
| > C:\dev\ros2_foxy\local_setup.bat
> C:\ADLINK\gstreamer\setupvars.bat > C:\ADLINK\eva\scripts\setup_eva_envs.bat |
Note:
1. The environment variables are removed when the command prompt is closed.
2. If you changed the ROS 2 folder when installing ROS 2 Foxy Fitzroy, fill in the actual path.
On Linux (including x86 and AArch64), after installing the EVA SDK and required software, use the following commands to execute the EVA SDK IDE.
| $ rm ~/.cache/*/*bin
$ . ~/ros2_foxy/install/local_setup.bash $ source /opt/adlink/eva/scripts/setup_eva_envs.sh $ EVA_IDE |
Note:
1. The environment variables are removed when the command prompt is closed.
2. If you changed the ROS 2 folder when installing ROS 2 Foxy Fitzroy, fill in the actual path.
For more details about ADLINK EVA, refer to https://eva-support.adlinktech.com.
¶ 2 EVA SDK IDE User Interface
This chapter introduces the EVA SDK IDE user interface (UI) and common UI operations.
¶ 2.1 Introduction
This section is a detailed description of the UI.

Figure 1: EVA SDK IDE User Interface (UI)
Table 1: EVA SDK IDE User Interface (UI) Items
|
Item |
Description |
|---|---|
|
Canvas |
This area is used to edit elements and pipelines. Note: EVA SDK IDE only supports a single canvas to display the graph. |
|
Element (Node) |
The element is the node from PyFlowGstreamer. Only support the configurable GStreamer element list. |
|
Pipeline |
Use this area to link the elements as a pipeline. |
|
GStreamer Control Buttons |
After creating a pipeline, click “Play”, “Pause” or “Stop” to control it.
|
|
Properties |
Select an element to show its editable properties. For more details, refer to Edit Properties of Elements |
|
Metadata Viewer |
Shows the width, height, format of the video stream, the execution time, and AI information. For more details, refer to How to Review the Admetadata information. |
|
Alignment Buttons |
Select the nodes and click the alignment button to align them.
|
|
Canvas Screenshot |
Click the down arrow to change the image format.
|
 Play: plays a GStreamer pipeline
 Pause: pauses a GStreamer pipeline.
 Stop: stops a GStreamer pipeline.
 Aligns the selected nodes to the left node.
 Aligns the selected nodes to the right node.
 Aligns the selected nodes to the top node.
 Aligns the selected nodes to the bottom node.
 Takes a screenshot of the canvas and saves the image to file. The default image file format is PNG.
¶ 2.2 UI Operations
¶ 2.2.1 Move the Canvas
Method 1: Hold down <Alt> and the left mouse button to drag the canvas.
Method 2: Hold down the middle mouse button to drag the canvas.
¶ 2.2.2 Zoom the Canvas
Method 1: Scroll the mouse wheel to zoom the canvas.
Method 2: Press <Ctrl> + <=> to zoom in the canvas; press <Ctrl> + <-> to zoom out the canvas.
¶ 2.2.3 Hotkeys
Quickly zoom in and display a node: Click the node (element) on the canvas and press <F>.
Quickly display all nodes: Press <H>.
¶ 3 Create an Empty Canvas
Method 1: Execute the EVA SDK IDE to start with an empty canvas.

Method 2: From the File menu, select New file, to create an empty canvas.

Note:
New file will clean all elements and pipelines in the canvas.
¶ 4 Creating GStreamer Pipelines
This chapter describes how to create and run GStreamer Pipelines in the EVA SDK IDE.
¶ 4.1 Adding an Element
¶ 4.1.1 Right-click Method
Use the following steps to add an element using the right-click method.
- Right click on the canvas.
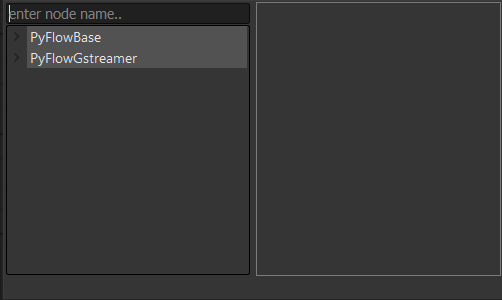
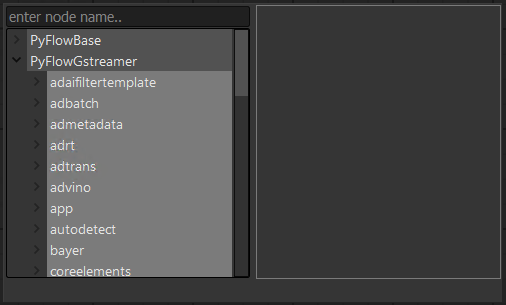
- Select PyFlowGstreamer and choose the element, or enter element name in enter node name to search the specified element.
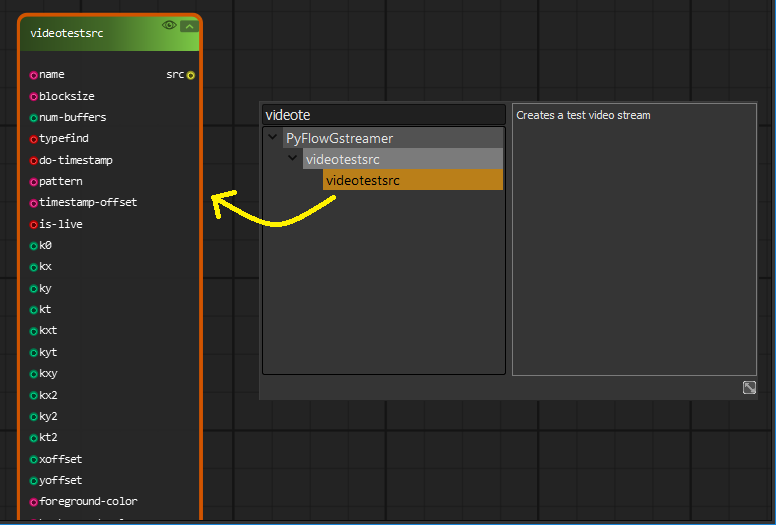
- Drag the specified element to the canvas.
¶ 4.1.2 NodeBox Method
Use the following steps to add an element using the NodeBox method.
- Tools -> PyFlowBase -> NodeBox
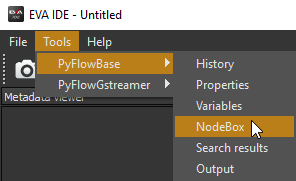
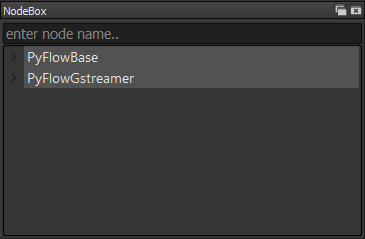
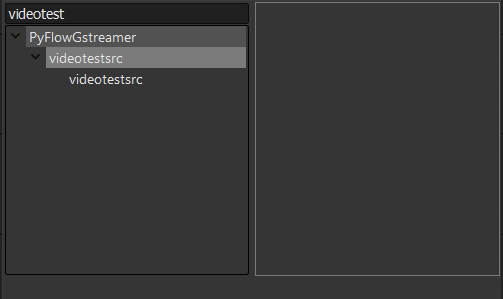
- Select PyFlowGstreamer and choose the element, or enter element name in enter node name to search the specified element.
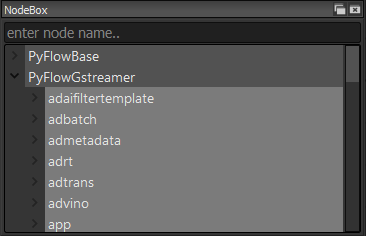
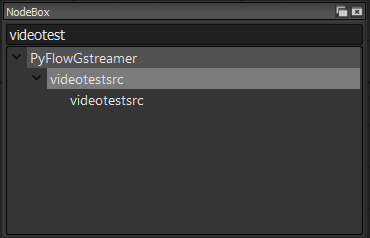
- Drag the specified element to the canvas.

¶ 4.1.3 Pin Hint Method
Use the following steps to add an element using the Pin Hint method.
- Left-click a source pin of an element (such as src pad or sink pad) and drag it to an empty space.
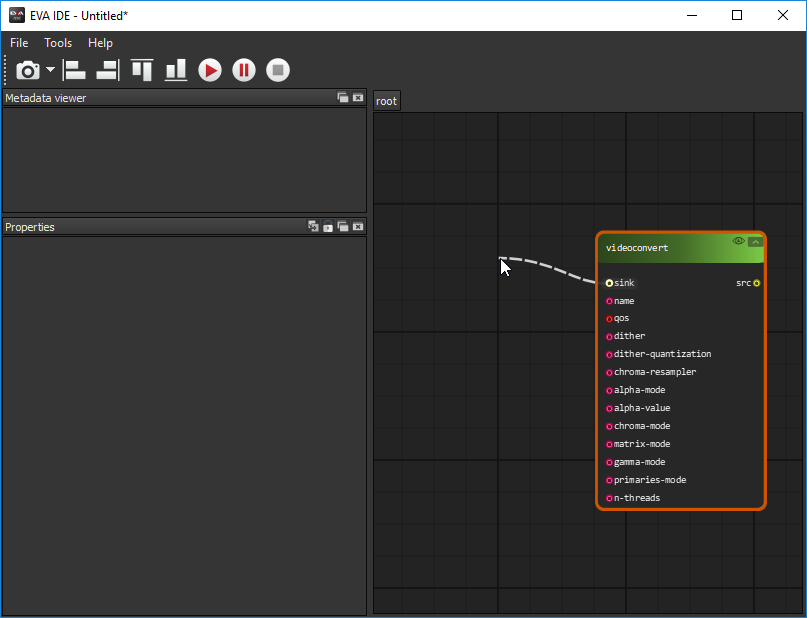
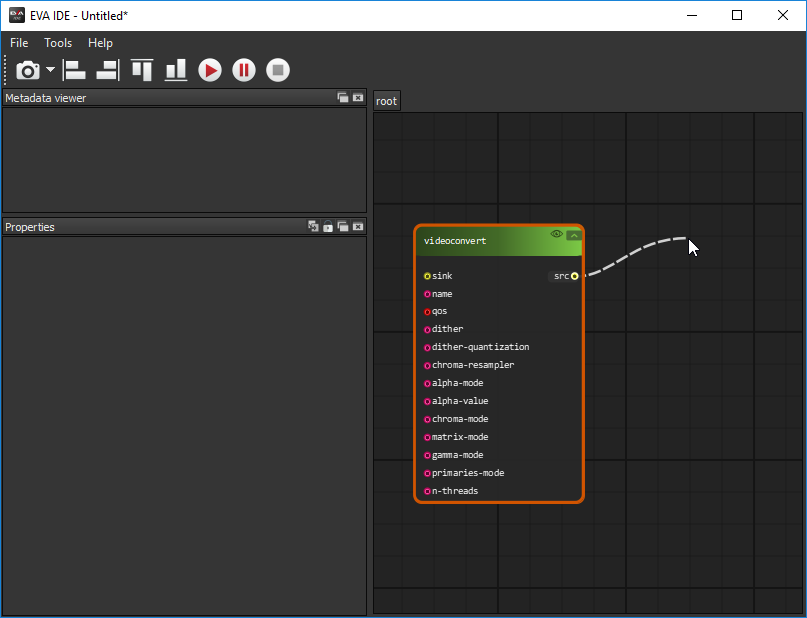
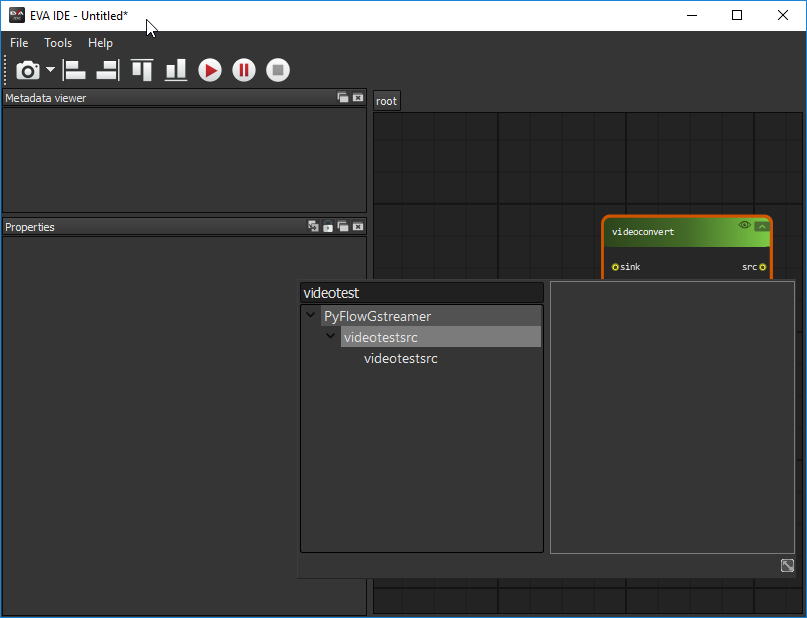
- The NodeBox will display on the screen. Enter an element name in enter node name to search the specified element.
Note: Pin Hint can filter out incompatible pins between two nodes (elements). However, the src pin or sink pin of some elements has a special format that causes another element’s pin to not be found via Pin Hint, even when the two elements should be connectable. To fix this issue, use the NodeBox method to search the element and drag it to the canvas and link the elements.
For example, glupload element's src pin cannot find glcolorconvert element via Pin Hint.
¶ 4.2 Deleting Elements
To delete an element, select it and then press <Delete>.
¶ 4.3 Editing Element Properties
Note: Properties must be modified when the pipeline state is stopped.
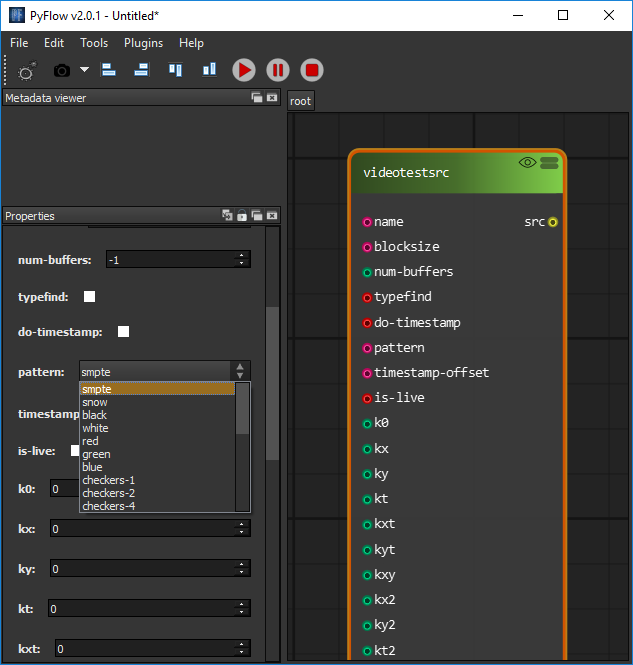
- Select an element to modify its properties. For example, select videotestsrc to display its properties.
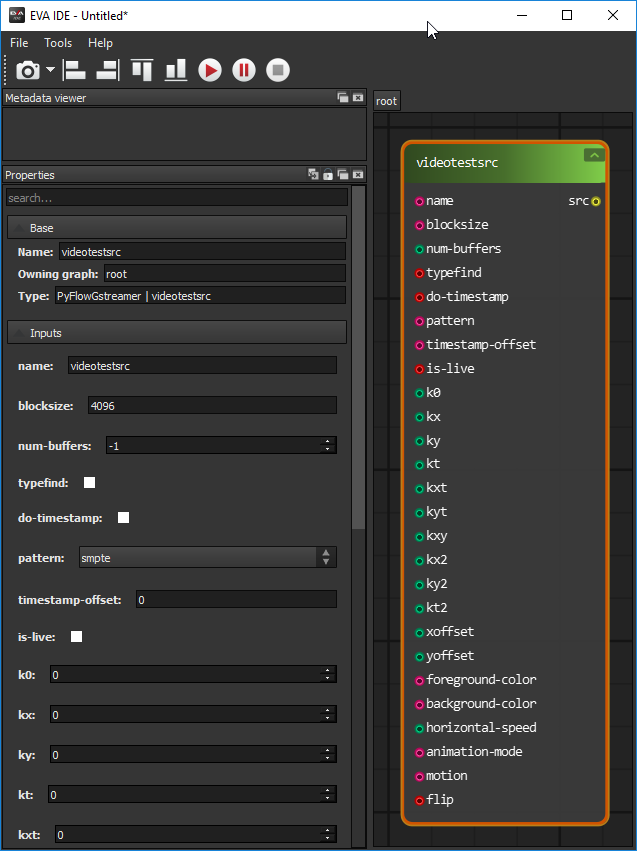
- Click pattern, and select ball.
¶ 4.4 Linking/Unlinking Elements
¶ 4.4.1 Linking Elements
To connect elements, left-click the source’s element GstPin and drag it to the target’s GstPin. GstPin includes src and sink. In the following example, The left figure is a sink GstPin connected to a src GstPin. The right figure is a src GstPin connected to a sink GstPin.


The following figure is linked.

Note: If using pin hints, the connection will link automatically.
If the sink GstPin or src GstPin supports multiple streams, such as a tee element that supports multiple output streams, multiple elements can be connected.

¶ 4.4.2 Unlinking Elements
Method 1: Click the connection near sink or src GstPad to unlink the elements.
Method 2: Right-click on the link line, and then click “Disconnect” to unlink the elements.

¶ 4.5 Pipeline Controls
Note: All operations must be performed when the pipeline is stopped, otherwise unpredictable results can occur.
¶ 4.5.1 Play a Pipeline
After creating a complete pipeline in the IDE canvas, click the play button ( ) to play the pipeline.
¶ 4.5.2 Pause a Pipeline
After creating a complete pipeline in the IDE canvas, click the pause button ( ) to pause the pipeline.
¶ 4.5.3 Stop a Pipeline
After creating and playing a complete pipeline in the IDE canvas, click the stop button ( ) to stop the pipeline.
¶ 4.6 Collapsing/Expanding Element Properties
Click  to collapse an element, and
  to expand it.

¶ 4.7 Use Cases
This section includes examples on how to use the EVA SDK IDE.
¶ 4.7.1 Use Case 1
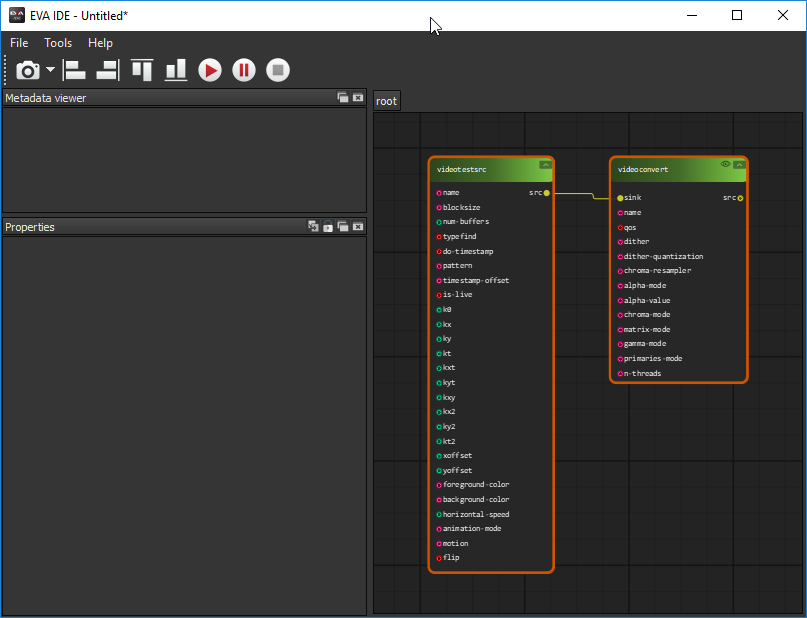
This example describes how to play a test video via OpenGL.
Use the following gst-launch command.
|
gst-launch-1.0 videotestsrc ! videoconvert ! glimagesink |
First, add a videontestscr element, a videoconvert element, and a glimagesink element to the canvas in the EVA SDK IDE. The videotestsrc element must connect to the videoconvert element, and the videoconvert element must connect to the glimagesink element as shown in the figure below.

Click the play button to show the video in an OpenGL renderer.

Click the stop button to stop the pipeline.
¶ 4.7.2 Use Case 2
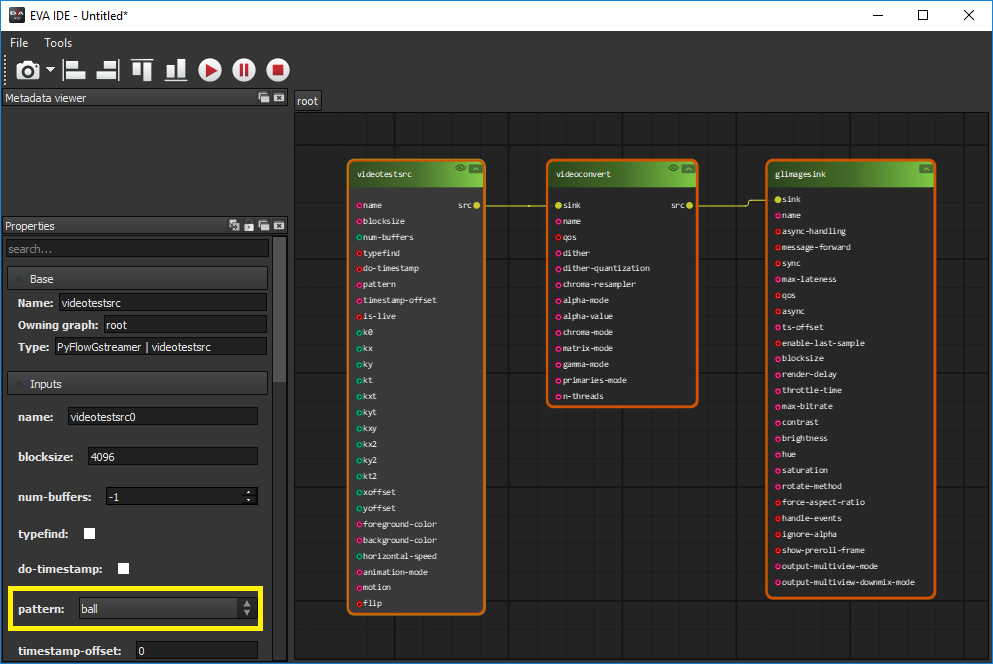
This example describes how to play a test video with a ball pattern via OpenGL.
|
gst-launch-1.0 videotestsrc pattern=ball ! videoconvert ! glimagesink |
Following from the example in Use Case 1, in the stop state, select the videotestsrc element and modify its pattern property to ball.
Click the play button to show the ball video in an OpenGL renderer.

Click the stop button to stop the pipeline.
¶ 4.8 Gst Commands
To generate Gst commands from pipelines in the canvas, click Play GStreamer pipeline. When the pipeline’s state changes to playing, it will send a play event to trigger gst-command generation. The gst-lauch-1.0 commands will be generated in C:\ADLINK\eva\IDE\command.txt on Windows and /home/<user>/adlink/eva/IDE/command.txt on Linux.
If there is more than one pipeline in the canvas, all of the commands will be included in the file.
In the following example, there are two pipelines in the canvas.

After playing, the gst commands are created in command.txt.

d3dvideosink element only supports Windows. Please use another element such as xvimagesink for testing.
Notes:
1. The command file will be erased each time GStreamer is played. Be sure to back up command.txt if you want to save the Gst commands.
2. The Gst commands will not generate immediately after clicking the playing pipeline because it is waiting for the play event. For example, a pipeline is playing but a plugin delay occurs that causes an event delay, resulting in the command being generated later when the play event is sent.
¶ 5 Reviewing Admetadata Information
Admetadata information includes the width, height and format of the video, execution time (ms), and inference information (if any) in the specified element.
After creating a complete pipeline, click ViewImage,  or
or  , on the specified element to open its metadata viewer. If there is no video source, the screen will show noImage.
 : Close state.
 : Open state.

Click the play button to start the pipeline; the image (if any) will display. Then click the specified element; the metadata viewer will show the Admetadata information.

After playing and showing the admetadata information, you can click the pause button to pause the streams, or click the play button to keep playing them.
Supported image formats:
- BGR
- BGRA
- BGRX
- RGB
- RGBA
- RGBX
- GRAY8
Note: The pipeline performance will be affected when ViewImage is enabled, such as frame drops and video delays. Enabling ViewImage will increase the latency of the entire pipeline, with performance impact depending on video size and the number of enabled ViewImages. If the latency is too long, the frame timestamp will not match the synchronization plugin, such as ximagesink, resulting in dropped frames.
¶ 6 Reviewing GStreamer Pipeline Graphs
EVA SDK IDE supports GStreamer pipeline graphs for debugging. For more details, refer to https://gstreamer.freedesktop.org/documentation/tutorials/basic/debugging-tools.html?gi-language=c#getting-pipeline-graphs
Note: This function only supports Linux x86 and Linux ARM platforms.
After creating a pipeline, open the pipeline graphviz windows from the menu bar:
Tools -> PyFlowGstreamer -> Pipeline graphviz

Pipeline graphviz will display at the bottom left of the EVA SDK IDE.

You can click the  button to split the windows and resize them to view the pipeline graph.

If you modify the pipeline on the canvas, you can click Refresh to reload the new graph.

¶ 7 Save/Load a GStreamer Pipeline
¶ 7.1 Save a GStreamer Pipeline
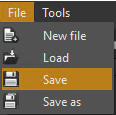
Select File -> Save or File -> Save as a pygraph file.

¶ 7.2 Load a GStreamer Pipeline
Select File -> Load to load a pygraph file.

Note:
Loading a pygraph file will erase the current elements and pipeline in the canvas. It is recommended that you save the graph before loading another file.
If a pygraph file contains unsupported elements, the elements will not be loaded to the canvas. For example, Windows does not support ximagesink. If a pygraph file includes ximagesink, the canvas will not include it, so you will need to modify the pipeline after loading it.
¶ 8 Whitelist Plugins and Elements
EVA SDK IDE only supports the specified GStreamer elements and plugins. This chapter introduces how to expand elements and plugins (C/C++ based) in the whitelist.
After first running EVA SDK IDE, a whitelist will be generated in C:\ADLINK\eva\IDE\config\element_list.txt (Windows), or /home/<user>/adlink/eva/IDE/config/element_list.txt (Linux).
The default content of the element_list file is empty.
Use the following rules to enable an element or plugin in EVA SDK IDE:
- [Element_name]
- [Plugin_name]
- +[Element_name]
- +[Plugin_name]
Use the following rule to disable an element or plugin in EVA SDK IDE:
- -[Element_name]
For example, add the autovideosink element and disable the rtpdec element:
- Open element_list.txt.
- Enter the following in element_list.txt.
+autovideosink
-rtpdec
- Restart EVA SDK IDE.
Note:
- Only C/C++-based plugins and elements are supported. Enabling python plugins will result in unpredictable behavior.
- If other third-party plugins or GStreamer plugins excluded by the default whitelist have any issues, contact the developers directly.
¶ 9 Use Limitations
¶ 9.1 EVA SDK IDE Limitations
- The EVA SDK IDE does not support custom python plugins/elements.
- The EVA SDK IDE will not retain the dock tools added by users.
- The EVA SDK IDE will not restrict users from mismatched translators to connect the inference models. Confirm that the inference model elements will connect to the matched translator. Otherwise, the incorrect translator may try to access memory without permission, causing the EVA SDK IDE to crash. For example, a Yolo inference model must use the adtrans_yolo element.
- All operations must be performed when the pipeline is stopped, otherwise unpredictable conditions will occur. To fix this issue, restart the EVA SDK IDE.
- The pipeline performance will be affected when ViewImage is enabled, such as frame drops and video delays.
- If Pin Hint cannot find a specified element because of its special format, use the NodeBox method to search for the element and drag it to the canvas to link the elements.
- There are graphics and debugging functions in the EVA SDK IDE that cause performance loss. If you would like to pursue optimization, use the command tool (gst-launch).
¶ 9.2 PyFlow Known Issues
- Abnormal mouse operations may make PyFlow crash. To fix this issue, restart the EVA SDK IDE.
- When an element’s pin has a special capability, it can cause another element’s pin to not be found via Pin Hint when the two elements should be connectable.
¶ 9.3 GStreamer Pipeline Limitations
- There cannot be any unlinked source elements such as filesrc in the canvas.
- There cannot be any unlinked sink elements such as autovideosink in the canvas.
- There cannot be any unlinked bin elements such as decodebin in the canvas.
¶ 9.4 glimagesink Element Limitations
- The glimagesink element only supports one object in the pipeline on Windows.
- Only one glimagesink node can be added to the canvas on Windows.
- When adding a GStreamer element to the canvas, a new gstreamer object will be created automatically. If an existing glimagesink element is deleted from the canvas and a new one is added, there will be multiple glimagesink objects.
¶ 9.5 Inference Engine Element Limitations
- The inference node (such as advino, adrt and adonnx) will cache the model in the memory after pressing the "Play" button to avoid the model loading every time (around 5-30 seconds depending on the model size). Remove the unused inference node to free the memory space when editing the pipeline in EVA IDE.
Safety Instructions
Read and follow all instructions marked on the product and in the documentation before you operate your system. Retain all safety and operating instructions for future use.
- Please read these safety instructions carefully.
- Please keep this User‘s Manual for later reference.
- Read the specifications section of this manual for detailed information on the operating environment of this equipment.
- When installing/mounting or uninstalling/removing equipment, turn off the power and unplug any power cords/cables.
- To avoid electrical shock and/or damage to equipment:
- Keep equipment away from water or liquid sources.
- Keep equipment away from high heat or high humidity.
- Keep equipment properly ventilated (do not block or cover ventilation openings).
- Make sure to use recommended voltage and power source settings.
- Always install and operate equipment near an easily accessible electrical socket-outlet.
- Secure the power cord (do not place any object on/over the power cord).
- Only install/attach and operate equipment on stable surfaces and/or recommended mountings.
- If the equipment will not be used for long periods of time, turn off and unplug the equipment from its power source.
- Never attempt to fix the equipment. Equipment should only be serviced by qualified personnel.
Getting Service
Ask an Expert: http://askanexpert.adlinktech.com
ADLINK Technology, Inc.
Address:No. 66, Huaya 1st Rd., Guishan District,
Taoyuan City 333411, Taiwan
Tel: +886-3-216-5088
Fax: +886-3-328-5706
Email: service@adlinktech.com
Ampro ADLINK Technology, Inc.
Address:6450 Via Del Oro
San Jose, CA 95119-1208, USA
Tel: +1-408-360-0200
Toll Free:+1-800-966-5200 (USA only)
Fax: +1-408-600-1189
Email: info@adlinktech.com
ADLINK Technology (China) Co., Ltd.
Address:300 Fang Chun Rd., Zhangjiang Hi-Tech Park, Pudong New Area
Shanghai, 201203 China
Tel: +86-21-5132-8988
Fax: +86-21-5132-3588
Email: market@adlinktech.com
ADLINK Technology GmbH
Address:Hans-Thoma-Straße 11
D-68163 Mannheim, Germany
Tel: +49-621-43214-0
Fax: +49-621 43214-30
Email: germany@adlinktech.com
Please visit the Contact page at www.adlinktech.com for information on how to contact the ADLINK regional office nearest you.